

Hello, my fellow hackers. I hope you guys are having an amazing day today. This article is all about Zenmap Download & Installation Guide & in this article how can we download ZenMap in Windows or Linux operating systems easily. We all know that whenever we need to scan any target system the first tool name which comes into our mind is “NMap”.
Undoubtedly “NMap” is a great network scanning tool with powerful features, but if you are a beginner and you are not very comfortable with the command line then you might have some problem using NMap because NMap is a command-line-based tool. So, if you want to use the Nmap network scanning tool then you can use Zenmap instead of Nmap.
Zenmap is a completely free and open-source tool which is the GUI version of Nmap. It is a multiplatform tool that is available for all major operating systems like Windows, Mac & Linux.
What is ZenMap?
Zenmap is an advanced network scanner designed to discover hosts and services on a computer network, thus creating a map of the network. It has been designed to rapidly scan large networks but works fine against single hosts. Zenmap is the official network scanner of the Nmap Security Scanner and has many powerful features including identification of thousands of OS fingerprints, detection of hundreds of protocols, support for IPv6, decoy/stealth scanning, external script scanning, and more. It was created to enable users of all skill levels to easily explore networks and conduct security audits.
Zenmap is a graphical user interface for performing advanced network scan tasks easily. Zenmap does not need any special hardware requirements and works on almost all operating systems including Windows, Mac OS X, and Linux. It performs more than just port scanning; it also supports version detection, service detection, identifying MAC addresses of devices connected to local networks of different protocols, and doing basic traceroute functionality.
How to Install Zenmap on Windows?
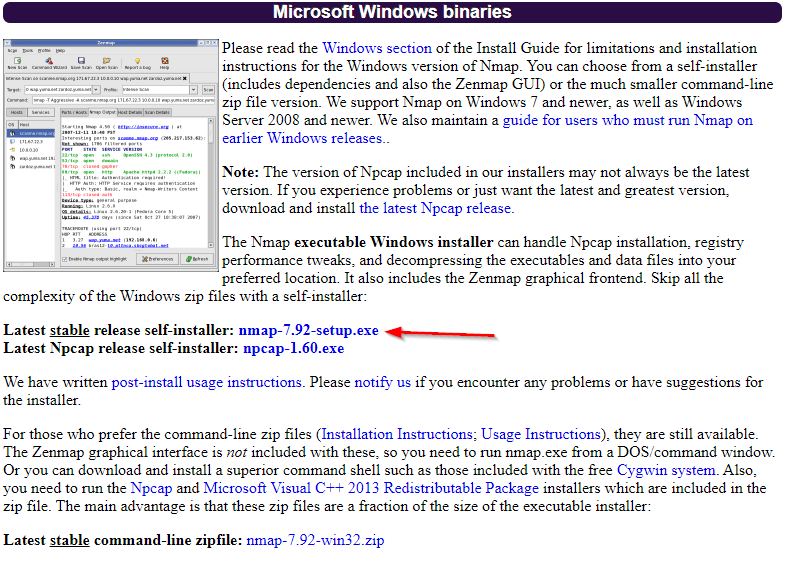
Zenmap can be downloaded by clicking here https://nmap.org/dist/nmap-7.92-setup.exe or you can download it from its official download page: https://nmap.org/download.html. After downloading, run zenmap-VERSION.exe to start Zenmap.
On Windows Vista or later versions of Windows, you may be asked to provide permission for Zenmap to make changes to your computer. Click Yes to proceed with the installation (this may require administrative rights on your part).
The installer will take care of installing all required components and help you set up a few things that make use of Zenmap’s scripting capabilities easier (such as mapping drives between hosts).
This installer is also capable of upgrading an existing copy of Zenmap if it is not a recent enough version, so running it without administrative privileges should be ok.
Installing Zenmap in Windows operating system is very easy but in the case of Linux, it’s quite tricky. Don’t worry I will tell you all the steps which are very easy to follow.
Zenmap Download & Installation Steps in Linux
Here we will download and install Zenmap in Kali Linux operating system which is a Debian-based Linux distribution so it doesn’t matter which Debian-based Linux distro you are using all the steps will be the same.
Now before we proceed with the downloading process I would like to tell you that in the earlier version of the Kali Linux operating system we get Zenmap preinstalled on it. But in the latest version of Kali Linux, we’ll have to download and install it separately. So let’s begin with the installation procedure.
Step #1: Downloading Zenmap
First, we’ll have to download the Zenmap from its official download page: https://nmap.org/download.html
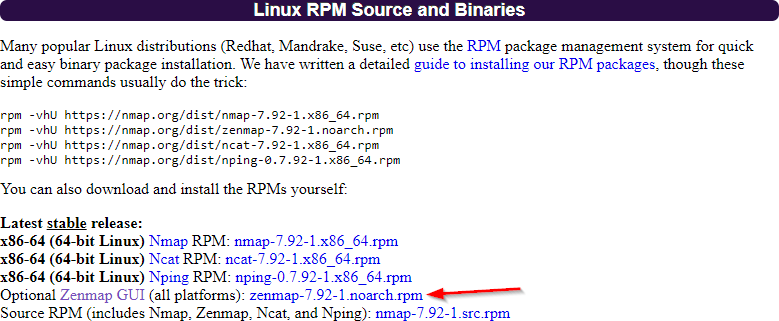
Or you can simply click here https://nmap.org/dist/zenmap-7.92-1.noarch.rpm to download Zenmap.
Step #2: Remove Any Existing Installation of Zenmap (Optional)
If you’ve tried to install Zenmap before and it doesn’t work properly then you’ll need to remove the existing installation of Zenmap to follow this tutorial properly or you may end up having some errors.
Just type this command to remove the Zenmap installation:
Command: sudo apt purge --auto-remove Zenmap This step is optional but it is recommended to run this command once before installing Zenmap.
Step #3: Update and Upgrade Your System
It is highly recommended to update and upgrade your full system before installing any tool or program so that all the packages get updated to the latest version and it will also fix the security issues.
So, to update and upgrade the system you’ll need to execute this command:
Command: sudo apt update && sudo apt upgradeJust wait some time and your entire operating system will be upgraded in some time this process will depend upon your internet speed and system’s performance.
Step #4: Install Alien Program
Now we’ll have to install the alien program to proceed with the installation of Zenmap. For those who don’t know about the alien, it’s a program that converts different Linux packages distribution to Debian. If you want to understand more about Alien then you can refer to this wiki page https://en.wikipedia.org/wiki/Alien_(file_converter).
In our case, the file which we need to convert is the Zenmap file which is in .rpm format and it doesn’t support Debian based operating system. Debian-based operating system supports .deb files. That’s why we will use the alien program to convert the .rpm file to a .deb file.
So, to install Alien we need to type this command in the terminal:
Command: sudo apt install alien
And after executing the command the alien tool will be installed without any errors.
Step #5: Zenmap Installation
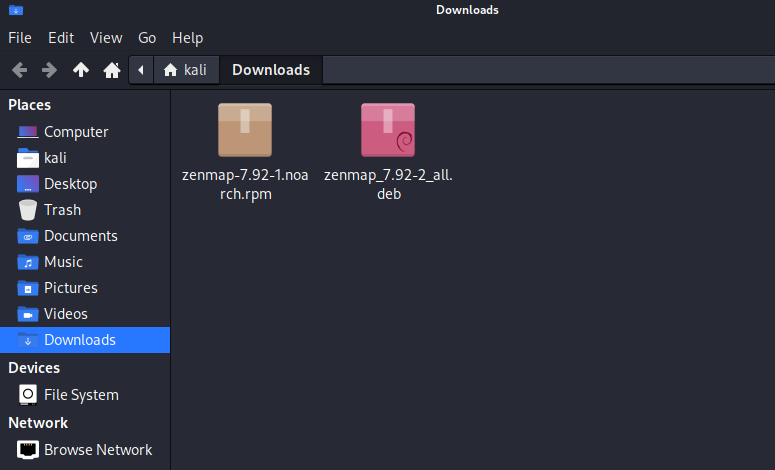
Now we are ready to install our Zenmap tool. So we need to navigate to our downloads folder where our Zenmap.rpm file is saved. Just type this command in the terminal to go to the downloads folder:
Command: cd Downloads/Here we will need to convert the .rpm file to a .deb file and for that, we will use the alien program. Just type this command in the terminal:
Command: sudo alien ZenmapFileNameAnd you will see two files in the downloads folder as shown below. The first file is the .rpm file that we downloaded before and the second file is the .deb file which is a converted file.
Now we’ll need to give this file executable permissions to install it. Just type this command:
Command: sudo chmod +777 ZenmapDebFileNameIf this command is executed successfully then you are good to go. Now we are ready to install the Zenmap package. To install Zenmap just type this command:
Command: sudo dpkg -i ZenmapDebFileNameAnd the zenmap will be installed without any errors.
Step #6: Download and Install Some Additional Python Tools
After installing Zenmap if we will try to run Zenmap it will not open because some additional python tools are required to run Zenmap and we will have to manually install them.
We need to install 3 python tools which are:
- python-gtk2
- python-gobject
- python-cairo
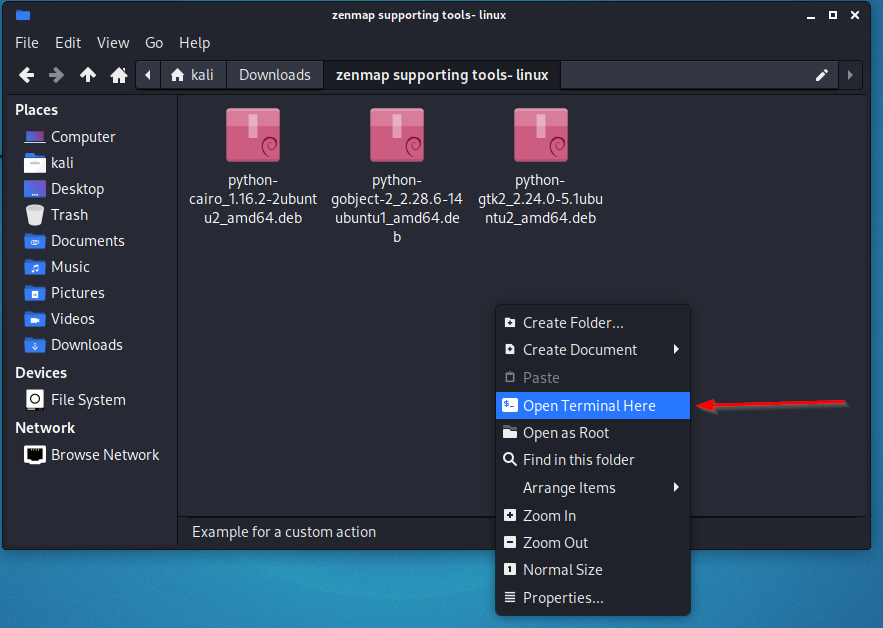
To download all these three tools just click here and 1 zip file will be downloaded.
Now unzip the file and open the folder, inside the folder right-click the mouse button and select open terminal here.
In the terminal execute these three commands one by one to install all python tools.
Command 1: sudo dpkg -i python-cairo_1.16.2-2ubuntu2_amd64.debCommand 2: sudo dpkg -i python-gtk2_2.24.0-5.1ubuntu2_amd64.debCommand 3: sudo dpkg -i python-gobject-2_2.28.6-14ubuntu1_amd64.debStep #7: Open Zenmap
After installing all the python tools now we are ready to fire up our Zenmap Scanner. Just type this command in the terminal:
Command: sudo Zenmap
Now as you can see in the above screenshot our Zenmap is now installed in our Kali Linux and it is ready to scan our target.
Configuring Zenmap Scan Options
First, you need to select which type of scan you want to perform. Zenmap is a command-line tool, so it’s generally easier to use when you’re familiar with these types of interfaces. Fortunately, there are pre-configured settings that can be easily selected by clicking on one of these buttons:
Quick Scan: If you only have a few ports open, pick Quick Scan to run a basic scan.
Intense Scan: This is a more intensive method that will test every single possible port against every single possible protocol!
You should only use Intense Scan if you already know what services are running on your target computer or network device.
Configuring your scan options is a must, especially when you’re performing a vulnerability assessment. That’s because you want to ensure that every port is being scanned and that every protocol is active.
Is Zenmap better than Nmap?
Zenmap is a graphical user interface (GUI) to Nmap. While Nmap provides great functionality, Zenmap helps make it easier to operate through simple clicks rather than typing a lot of commands. However, if you prefer more control over your scans and other features then using Zenmap will simply slow you down. It’s up to you how much power you want at your fingertips when scanning but if in doubt use Nmap directly to ensure you have complete control over your scan.
If you’re going to be using Nmap in your professional life, it would behoove you to know about Zenmap. It is an easier-to-use version of Nmap that has a GUI interface (graphic user interface) so it can display your scans in a more readable way. Either way, knowing how to use them will make you incredibly efficient as a security analyst; with so much information at your fingertips, you won’t need to waste time sifting through results by hand.
Conclusion
Zenmap is a very useful tool that can be used for multiple purposes. It’s important to make sure you know how to install it on your PC, as well as make sure it is up-to-date before use. Now that you have read through my guide, it is time for you to try installing Zenmap on your computer. Remember that if you need help, there are many ways to get support; feel free to comment at any time with questions or concerns! I wish you good luck with your Hacking Journey.
Thank You for giving your valuable time on reading this article, if you like this article on zenmap download and installation guide 2022 then please share as much as possible. See you in our next article!
Also Read: WiFi Pentesting Complete Guide for Beginners 2022
I'm an Ethical Hacker, Penetration Tester, Content Creator, Technology Lover, Passionate Learner & The Founder of Spinning Security. For Any Inquiry Contact Us Here :- contect.spinningtech@gmail.com
- How to Become a Professional Gambler - March 29, 2024
- X Premium Subscribers to Gain Access to Grok AI Chatbot: A Strategic Move by Elon Musk - March 28, 2024
- Google Introduces AI Travel Assistant for Seamless Vacation Planning - March 28, 2024
Unable to install gtk2 on kali linux
└─[$] python –version
Python 3.10.5
└─[$] uname -a
Linux mykali 5.18.0-kali5-amd64 #1 SMP PREEMPT_DYNAMIC Debian 5.18.5-1kali6 (2022-07-07) x86_64 GNU/Linux
└─[$] sudo dpkg -i python-gtk2_2.24.0-5.1ubuntu2_amd64.deb
Selecting previously unselected package python-gtk2.
(Reading database … 320478 files and directories currently installed.)
Preparing to unpack python-gtk2_2.24.0-5.1ubuntu2_amd64.deb …
Unpacking python-gtk2 (2.24.0-5.1ubuntu2) …
dpkg: dependency problems prevent configuration of python-gtk2:
python-gtk2 depends on python (<= 2.7); however:
Package python is not installed.
python-gtk2 depends on python:any (>= 2.6.6-7~).
python-gtk2 depends on libgdk-pixbuf2.0-0 (>= 2.22.0); however:
Package libgdk-pixbuf2.0-0 is not installed.
python-gtk2 depends on python-gobject-2 (>= 2.21.3); however:
Package python-gobject-2 is not installed.
dpkg: error processing package python-gtk2 (–install):
dependency problems – leaving unconfigured
Errors were encountered while processing:
python-gtk2